My son, Lee, plays a mean game of checkers. The two games I played with him this week, the first two games of checkers I ever played with him, he beat me fair and square. (Ok, I pointed out a few times that he could jump me…) The practice he had playing at Grandma’s house apparently paid off. Until earlier this week, I’d never played with him, because we had no checkers set at home.
Last week, as I went for a walk with my kids to the park, I kept an eye out on the ground for bottle caps to use for a certain project I was planning on doing. Fortunately, or rather, unfortunately, because there were so many bottle caps littered on the ground, on just that one trip we were able to collect way more caps than we needed for the project, so I tried to think of something else to do with them.

All those caps lying there inspired me to make a checkers set.
Total cost? Negligible- only for the ink used from the marker, and a bit of tape.
In my mind, the set looks quite nice, is user friendly, and also is environmentally and budget friendly, because not only did I not pay for any of materials, I dumpster dove and removed some of the litter from my neighborhood in order to make this.
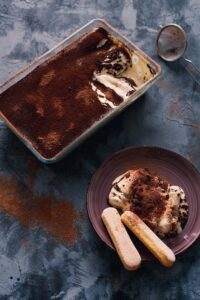
How to Make Your Own Free Homemade Checkers Set-
1. Collect your bottle caps in two colors. You need 24 pieces total, 12 in each color.
2. Get your pieces for your board. I dumpster dove to thin pieces of wood with a white shiny coating on one side a bit back, (from the dumpster behind a carpentry shop) which I decided to use for this. You can use other pieces of thin wood (even without the white coating) or cardboard. By taking two thin rectangles instead of one square, you’re able to fold the board to put it away, like a regular board game.
3. Mark a grid on your board, 8 squares by 8 squares. Try to make the squares as even as possible, and with as straight lines as possible. I know my squares in the middle are different sizes from the rest- that’s because I didn’t want to have to cut the board again, and the two boards were different widths.


5. Start filling in all the squares with the X.


8. I put tape across the entire length of the front of the board, in overlapping strips, to keep the squares in better condition, so they don’t accidentally wipe off, etc…

9. Set up your game of checkers, and play! For those that don’t know them, here’s the rules. To make a king, just flip over the cap.
Linking up to Frugal Friday,